
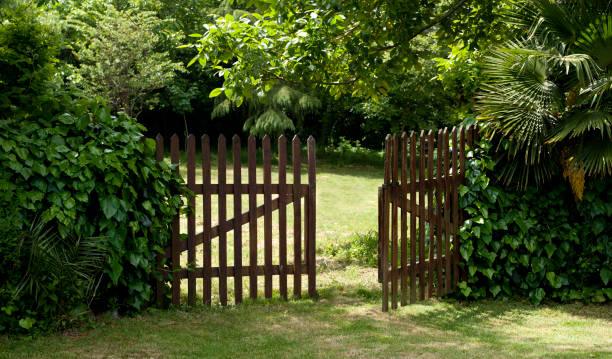
With good cause, wooden decks have become a standard feature on homes from coast to coast. They may be constructed at a range of heights to fit any home’s elevation and are a reasonably inexpensive option to add useful square footage to the exterior of your home. Consequently, decks frequently have stairs that are sometimes quite high off the ground. Many homeowners choose a deck gate to prevent access to the stairs for this reason.
Whether you want to secure the safety of your children and pets while they play on the deck or prevent them from straying off, a DIY deck gate is an ideal answer. This easy-to-build gate is not only the icing on the cake for a gorgeous wood deck, but it will also provide you the peace of mind you need to enjoy your deck with your family and pets. With the proper equipment, both novice and experienced do-it-yourselfers may easily do this task, but it is essential to adhere to local building rules to ensure the security of your gate.
Before You Begin
Before acquiring your supplies, critically evaluate the existing wood components on your deck. Are the planks and handrails sound? If not, do whatever is necessary to bring the deck up to par before proceeding. Replace rotten wood with new wood and tighten screws. Even the most secure and well-constructed deck gate will fail if attached to a failing deck. Plan on resealing the deck if it needs a seal coat while you’re at it.
While measuring the deck’s entrance, verify the plumb of the side posts with a level. If the posts are somewhat crooked, adjust the mounting of the gate and hinges accordingly. If the posts are significantly out of plumb, it may be necessary to replace or repair them before mounting a gate.
Check Your Local Building Codes
After you’ve measured the opening of your deck to construct your materials list, please review the building codes to ensure you’re abiding by them.
Here are the specifications you should follow:
- Minimum gate height: 42 inches
- Maximum baluster spacing: 4 inches
- Maximum height from deck floor when closed: 4 inches
- Must open into deck rather than out
- Must be secured to the top and bottom rails with strap hinges
- Self-latching clasps must be a minimum of 3 inches from the top of the gate
Always check with your specific local building codes before moving forward with the construction of your gate.
Safety Considerations
For the majority of do-it-yourselfers, the procedure of constructing a deck gate is not too scary. In reality, skilled do-it-yourselfers could likely design and construct a deck gate with minimal effort. Nevertheless, it is essential to adhere to building codes when doing house upgrades.
The building codes exist to ensure that you, your family, your pets, and your guests are safe on your deck. Not only would failing to build your gate according to code result in a failing grade on a future home inspection, but it will also compromise the gate’s safety. Follow the this tool ETL carefully and make alterations only if they comply with the building code.
A correctly constructed deck gate will make your deck a safer area for children and pets to play. Despite the installation of a deck gate, young children should not play on a deck without adult supervision.
What You’ll Need
Equipment / Tools
- Miter saw or circular saw
- Tape measure
- Pencil
- Speed square
- Level
- Drill
- Drill bits
- Staining or painting supplies
- Orbital sander
Materials
- 2×4 x 8-foot pressure-treated pine boards
- 2×2 x 8-foot pressure-treated pine boards
- 2-1/2-inch self-drilling exterior wood screws
- 1-1/4-inch self-drilling exterior wood screws
- 2 Gate strap hinges
- Self-latching gate clasp
- 1/4-inch x 1-1/4-inch lag bolts (optional)
- 1/4-inch washers (optional)
- All-in-one staining deck sealant or exterior latex paint
- 120-grit sanding pads
- Scrap wood
Instructions
How to Build a Deck Gate
This deck gate design is based on a code-compliant conventional wood deck. Aside from the parameters specified by the code, the lengths and heights of your deck may vary. Observe the directions carefully and adjust these measurements as necessary. In addition, the above-mentioned supplies list is a general reference that should be updated to fit your demands.
- Acclimate the Wood
Sometimes, newly purchased pressure-treated boards have a high moisture content. This wood is extremely dense and may even feel damp to the touch. Allow the wood to acclimate in a dry, shaded area for at least 72 hours before utilizing it for your project to prevent warping and shrinking.
- Cut the Gate Rails
The gate rails are the top and bottom horizontal support planks of the gate. The width of your aperture will determine the length of them. Once you have determined the width, deduct one inch for hardware and clearance, and then use a miter saw or circular saw to cut a 2×4 into two pieces of the determined length.
- Cut the Gate Posts
2×4 boards make good gate posts. Each end of the gate has a post. The length depends on gate height, with a minimum of 42 inches and a maximum of 4 inches from the deck. A 42-inch gate that’s 4 inches from the deck needs two 38-inch posts.
- Build the Frame
Screw frame rails to posts. Align the posts on your work surface. Adjust a top and bottom rail until the corners meet. Screw 2-1/2-inch self-drilling external wood screws through the rails into the posts, checking for squares. Each corner needs two screws.
- Measure for the Balusters
After assembling the gate’s frame, measure for the balusters. The building code mandates a maximum of four inches between balusters, so we’ll use that. Measure the distance between each post to establish how many balusters you’ll need.
- Cut the Balusters
Cut 2×2 boards to the same length as your gate’s posts. Cut 45-degree angles on each baluster. This will give the balusters a polished look and protect the end grain.
- Fasten the Balusters to the Frame
Flip the gate so the post side is up and place balusters to mimic spacing. Attach the balusters angled-side-up with 2-1/2-inch wood screws. If your gate’s width isn’t even, start in the middle and proceed outward.
- Sand All Surfaces
Remove splinters and rough edges with an orbital sander and 120-grit paper.
- Set the Gate in Place
Holding the gate will make this step easier. Even with support, attaching the gate to the deck is tricky. Before adding hinges, we recommend modeling up the location. Cut and stack scrap boards to the desired gate height above the deck (we decided on four inches in step two). Place the gate on scrap boards arranged next to each deck post. Adjust the gate to your liking.
- Attach the Hinges
Beginning at the top, arrange the open strap hinge so that one side rests against the gate rail and the other rests against the deck post, with the hinge point in the space between the rails. Using a tiny level, confirm that the strap is level, and then secure using the provided hardware. If your hinges do not come with hardware, use 1/4-by-1-1/4-inch lag bolts with washers. Before attaching the hinge, mark its position and drill pilot holes. On the bottom hinge, repeat.
- Attach the Self-Latching Gate Clasp
Attach a self-latching gate clasp opposite the hinges using 1-1/4-inch self-drilling external wood screws. Place the clasp a minimum of three inches from the top of the gate, per the building regulation.
How to Seal or Paint a Deck Gate
While pressure-treated boards are meant for external usage, they won’t last long without sealing or painting. Water and sun damage will weaken the boards over time.
Pressure-treated wooden decks need 30 days to acclimatize before sealing. Whether you’re just sealing your new gate or resealing your entire deck, wait at least 30 days. If you don’t, the sealant won’t penetrate.
Want a painted gate? Yes. Contrary to popular opinion, pressure-treated wood can be painted if the right preparations are taken. If painting, this acclimation phase is more critical, since painting pressure-treated wood before it’s fully cured will result in bubbling paint.


